So, you may ask how to add rows in excel in easy ways? You can easily add multiple rows by using a keyboard shortcut. For deleting rows tough, you can simply select them. After it, you can use click menu to eliminate or delete them from your spreadsheet. Now, you can follow our guide on adding rows and excel shortcuts for Mac users.
Table of Contents
Shortcut Keys to Add Rows in Excel: how to add rows in excel
When starting, you will hop onto your main sheet and click on the Rows tab. This will open up a view of all the existing rows. So now, you can pick the row number where you want to start. It is easy with Insert New Row button and voila. You have new row will pop up right below the one you selected.
After that, you can fill in the cells in your new row with whatever info you need. It might take a little while since you will have to fill in all the cells underneath.
As mentioned, if you have a keyboard with a number pad, you can use the shortcut keys to start at any row. While you are working at the spreadsheet, you can press Ctrl + 1 to add a new row. In case you wanna delete a row, you will press Ctrl + 0 instead.
how do you add a row in excel?
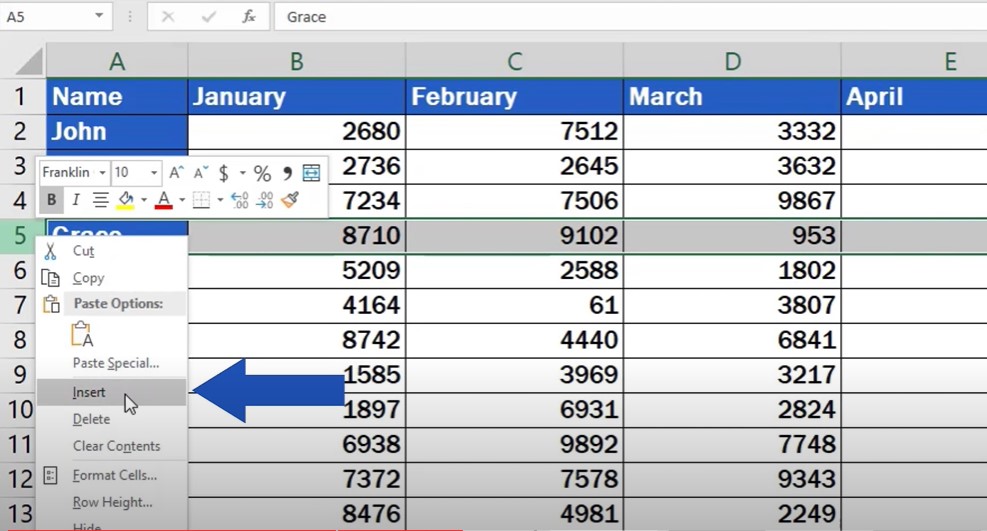
If you wanna insert a row at a specific position on a spreadsheet, you can proceed as follows.
After you click on Insert > Row, you will just look for the option to add a row. Then, you can pick where you want it to go. A quick way to get to the right spot is using Home key twice.
The next step is clicking on enter.
If you wonder how to Add Columns To the Insert dialogue box tough, you can choose Insert > Columns. The dialogue box will open right that second. This is actually prompting you to choose the direction in which you want the newly column. If you want to insert a column in the top left corner, you can choose Column in Top Left.
Also, you can choose another format from the Column in the menu. This works same for as many columns you wanna insert.
How to Delete a Row Deleting
Rows in Excel are easy to add and also easy to delete with mouse or shortcuts. You can use Delete key Instead of the Backspace key. Also, you can delete the row with Delete key. So, now you can use Arrow keys to select the row for removing.
Is there an insert row in excel? Add Rows in Excel
Now, you added a new row to worksheet as a blank row in the Excel column. With shortcuts, you can insert rows more easily.
A shortcut is useful to reduce repetitive mouse moments and usually it saves time when you get used to it. A single or combination of keys can simplify a lengthy procedure. In a financial entry for example, a bank executive noticed that an entire row contained the totals of the columns. A keyboard shortcut key makes it easy to insert a blank row quickly.
add a row to excel: how do you add rows in excel
Excel users really get a lot out of using shortcuts. You don’t need to memorize them all right away. But it is possible to write down a few on sticky notes until you learn them.
The more you use them, they will surely become easier we can guarantee it. For instance, you can insert a row using either “Ctrl + Plus Sign (+)” or “Ctrl + Shift + Plus Sign (+).” Another way is through the “Insert” dialog box. And if you want a quick method, you can use “ALT + I + R” to insert a row, too.
14 best Mac Excel shortcuts: adding rows in excel
You know how important it is to Add Rows in Excel if you work in Microsoft Excel as your job or homework requires it. You can take your work into next level. Because an Excel keyboard shortcut can work for adding rows in excel on your Mac.
Here below our list highlights 14 of the best Mac Excel shortcuts to insert a row.
- The options you can choose to insert above the current row are Option + Shift + Return.
- You can press Control + Option + Return to insert a row below the current.
- Also, you can select no of rows you will add. Then, you can press Option + Shift + Return.
- If you want to insert multiple rows below the current row, you can select the number of rows you want, then press Control + Option + Return.
- You will number of rows and then you will press Option + Shift + Return.
- Also, you can select Option + Shift + Spacebar to insert a row at the sheet’s beginning.
- A row at the end of a sheet, you can use Control + Option + Spacebar.
- To do this, you will select the number of rows you want to insert at the beginning. Then, you will go and press Option + Shift + Spacebar at the same time.
- For this shortcut to work, you can select the number of rows you want to insert at the end of the sheet. After then, you will do the same routine with Control + Option + Spacebar.
- Now, you can press Option + Return to insert a row above the current row. And you will shift the other rows down.
- Adding multiple rows above the current row and shifting the other rows down is easier with shortcut. You will determine row no you want to insert. And then, use shortcut of Option + Return.
- Here, you will select the number of rows, then press Control + Option + Return to insert multiple rows below.
- You can press Option + Spacebar to add a row to excel at the beginning of the sheet. And then, you can move the other rows down.
- Now, you got all you need if you are a Mac user and working on Excel files.

A dedicated Career Coach, Agile Trainer and certified Senior Portfolio and Project Management Professional and writer holding a bachelor’s degree in Structural Engineering and over 20 years of professional experience in Professional Development / Career Coaching, Portfolio/Program/Project Management, Construction Management, and Business Development. She is the Content Manager of ProjectCubicle.